With a backyard putting green made from synthetic turf, you can work on your golf game anytime you want. Synthetic turf makes this an easy project with no worries about growing and caring for grass which is both time-consuming tasks. Instead, spend your time playing the world’s most popular sport!
If you’re looking for a budget-friendly way to practice your putting, consider installing a small DIY putting green with one hole. Create multiple holes in a larger yard if desired! This guide will give an overview of how to build the perfect golfing space of any size and difficulty level.
- Choose a Location and Design
The DIY backyard putting green is a great way to sharpen your golf game. There are many options for designing and making the installation process easier with synthetic turf, but remember that you will need some prior knowledge about installing it properly. If you like more excitement in your life, consider one of those premade indoor/outdoor mats or an already installed putting surface so all you have to do is putting!
The first step to building a backyard putting green is deciding where you want it. Look for level ground with good drainage and be sure not to place it near your house or any other structures in case of stray golf balls.
When determining how to build a synthetic putting green, sketch the size and shape of your design. Sketch any slopes that you want in relation to where cups will go on your course. Designing with various challenges is another way for golfers not only can have fun but also work on their game at different levels by playing courses they are better suited for!
Make sure there’s enough space so puddles won’t form if it rains while someone plays because this could be dangerous since water would affect vision or even cause injury from slipping and falling into deep water pools surrounding the greens when rain falls during playtime.
Is your yard big enough for a putting green? Artificial turf is sold by the length in rolls that are 7 1/2-, 12- or 15-feet wide. You’ll also need to decide on the height and nap of artificial grass you would like, lower naps are recommended for this use.
- Outline the Green and Remove Sod
Once you’ve finalized your design, use spray paint to outline it in all of the colors that make up our beautiful world.
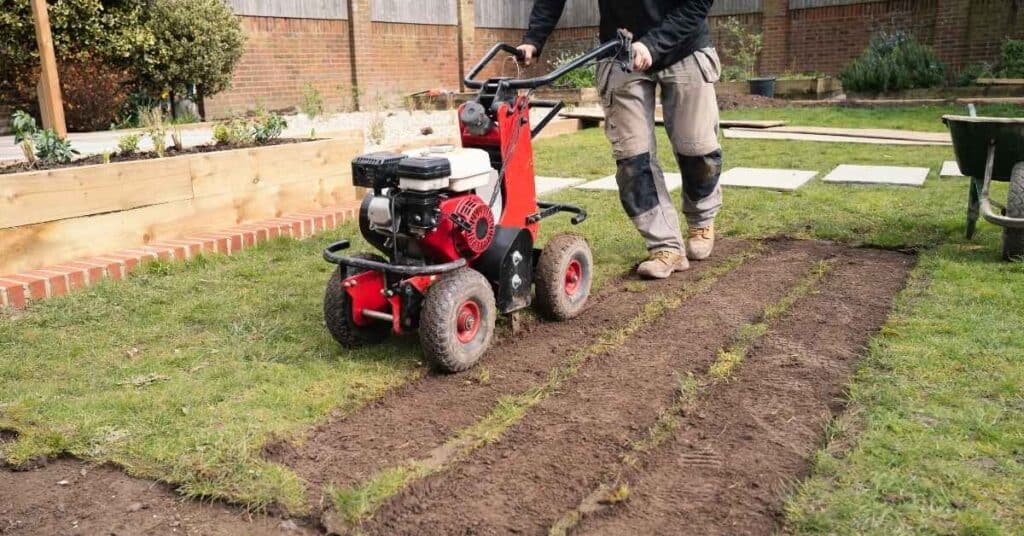
The next step is to remove the grass from inside the outlined area. You can use a sod cutter or you can cut it down with your line trimmer until there’s just dirt left.
The next step is to remove the grass from inside the outlined area. You can use a sod cutter or you can cut it down with your line trimmer until there’s just dirt left.
- Dig and Prevent Weeds
Excavate the area inside the outline. As a rule of thumb, go four to five inches deep for a crushed rock base. Spray ground-clearing weed killer and put down landscape fabric over bare dirt so weeds won’t grow back again!
- Put the Cups in Place
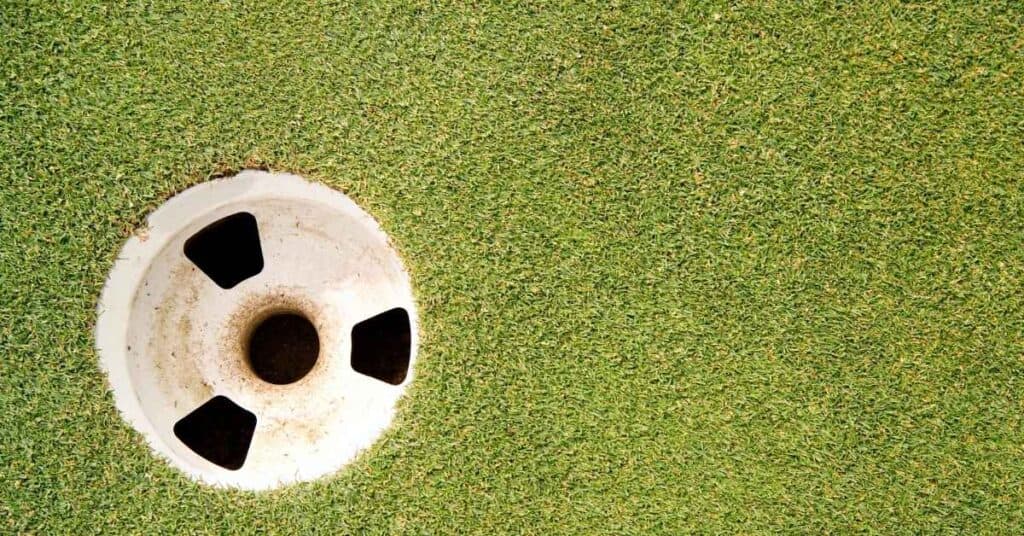
One of the most important steps in installing a backyard putting green is deciding where to put your cups. The best way for rainwater to drain off the greens, without making it difficult for you during playtime, would be by digging small trenches leading from each cup and past your new surface all while filling them with gravel so that they don’t fill up as quickly. This process should also help guide you when later on down the road if there’s any confusion about where these lines are supposed to go!
- Make the Base for Your DIY Putting Green
For the best base for your putting green, you need crushed stone. Make sure it is 1/4″ to 3/8″. Spread evenly with a rake or shovel and cover up any unwanted weeds by tilling them in first!
Do you want to have a small putting green in your yard? Do not worry, this project is easy. It all starts with moistening the rocks and then rolling them down flat. Once they are flattened out, use hand tamping on the top until it becomes smooth where golfers can put from hole to hole without any obstacles!
Make sure that you remove the crushed limestone from where your cups will go and make holes for them by using a spade or shovel. Use the hand tamper to compact rocks around their respective mounds, being careful not to hit any edges of these super-important items!
Smooth out any rocks that are sticking up with the backside of a lawn rake. Use sand to fill in small depressions or cracks between the rock and then use a level tool to make sure there is a 3-foot radius around each cup that’s smooth as well. This will help your ball roll properly!
- Pre-Shrink if Needed and Join Sections
A good way to ensure the synthetic turf you’ve chosen is perfect for your needs, without expensive trial and error, is by following these simple steps. First, unroll it on the ground in an area where people can walk or play on it – this will help prevent any accidental tears from cropping up during installation. Secondly, spray down with a garden hose until saturated then let dry at least 24 hours before installing!
Follow the manufacturer’s directions for cutting and joining sections of your synthetic turf. Make sure to match up to their nap so that it runs in one direction no matter where you put them on your lawn!
- Install and Cut the Synthetic Turf
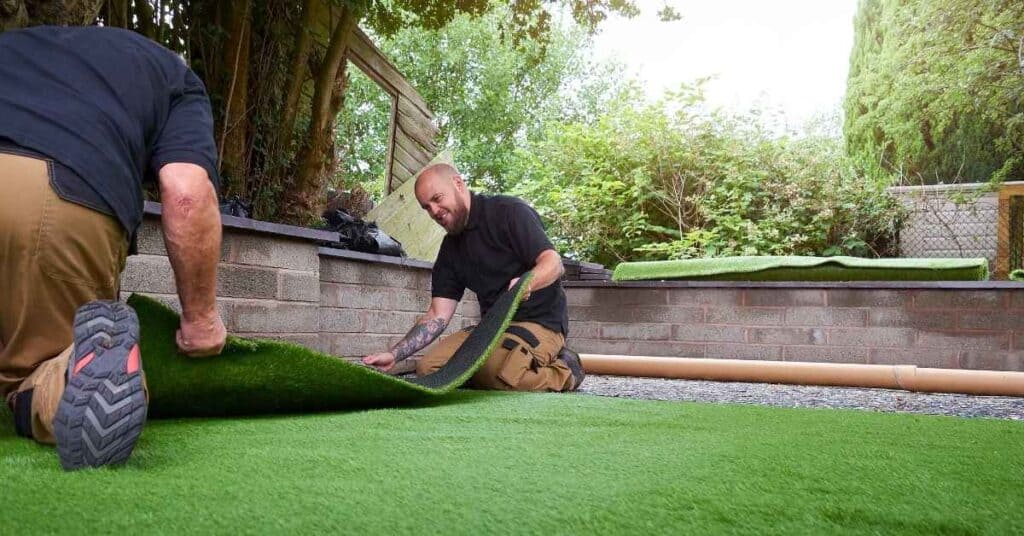
Next, put the synthetic turf or artificial grass over the crushed stones and carefully cut out your design with a sharp utility knife.
Now that you’ve got your cups in place, it’s time to make a hole for the turf. Find where you want each cup and press down on the ground with both hands about 4 inches from one another. Use your fingers to pull up pieces of grass until there are two small pockets left – there will be holes for putting our cups over top!
- Secure the Turf
Landscape staples are the perfect solution for securing synthetic turf. For a completely secure, watertight seal use pegs to hold down your artificial grass while you staple it in place with landscape staples or other means designed specifically for this purpose.
- Install a Border and Landscaping
One final step to make your green is the installation of a border around it. You can use blocks, or some other edging too! After this comes landscaping and adding chipping mats for protection from real grass damage.
- How to Maintain the Synthetic Turf
Like other outdoor sports equipment, to maintain the synthetic turf, sweep and hose it off regularly or follow the manufacturer’s directions. To make your job even easier some manufacturers recommend pouring sand over the turf and sweeping it into the turf to help hold it in place.
A backyard putting green is a great way to have fun at home. Go to the Home Depot or Amazon for all of the materials and landscaping supplies you need, including sod, potting soil, or mulch – whatever your lawn needs! The Home Depot also delivers online orders so that when you’re ready to start building your project they’ll be on hand.